Using oil on a daily basis has many benefits for your body. Natural oil is good for your hair, skin, and nails. Aphrodite's Essential oil is the perfect thing to use to help improve the overall look, feel and health of your body.
Aphrodite's Essential oil is a unique formulation of all natural oils. It is made up of 13 different types of oil, that work together for an amazing health and beauty treatment.
Hair Benefits
Apply the oil to your hair about 1 hour before shampooing to help detangle and smooth down your hair. Use a quarter-sized amount on a daily basis. It helps to keep your hair and scalp from drying out, along with eliminating frizz, increasing elasticity, while adding a great shine. It also helps your hair grow beautifully, healthy, and strong.
Skin Benefits
When used on the skin, Aphrodite's oil has great restorative, nourishing, and revitalizing effects. After you shower, mix the oil with your lotion and apply on your arms, legs, and any other places you have dry skin. The oil soaks in to help relieve the dryness. You can add a small amount in with your moisturizer for softer skin. It is even gentle enough to remove your eye make-up.
Nail Benefits
Aphrodite oil deeply penetrates the skin to insure healthier skin around the nails. Using the oil keeps cuticles soft, which helps them from becoming damaged. When used daily, it can help to restore moisture into dry cuticles and help brittle nails resume there natural strength.
Come in today and experience all the benefits of Aphrodite's Essential Oil. We use it in every service, and you can even purchase some to use at home. We hope you have smooth skin, beautiful nails, and healthier hair.
~aphrodite
Tuesday, April 23, 2013
Tuesday, April 16, 2013
At Home Treatments For All Hair Types.
Treatments can be great for your hair, and should be done once a week if you have damage to your hair. If you do not use the proper treatment for your hair type, it can end up having negative effects like to much oil, frizzy hair, and dry hair. Here are some treatments you can try at home for in between salon visits.
1. Basic Treatment. A basic treatment is one that works for all hair types. In the shower, apply a deep conditioner from the mid shaft of your hair to the ends. Let it sit on for 5-10 minutes, then rinse. If you have damaged hair from excessive coloring, or using to many heat products on it, let it sit in a towel after a shower for 10 extra minutes then rinse. You will have softer feeling hair. For best results do this treatment about once a week.
2. Fine Hair Treatment. If you have fine hair, using anything that is heavy and with lots of oils will weigh your hair down. Use a deep conditioning treatment, that has a volume booster. It will keep your hair soft, but when you go to style it, it will help you add the volume you desire. Do not use this too often because it will cause your hair to build up excess oil. Start out using it once a week for one month, then do every other week.
3. Medium to Thick Hair Treatment. Look for products that have natural oils in them. Oils like avocado, argan, coconut, sunflower, or almond will help to repair damaged hair. They will also help give a natural shine, and help your hair to grow stronger. Use this treatment as often as you find necessary but no more then once a week.
4. Coarse Hair Treatment. Every morning, use a quarter sized amount of an all natural oil to smooth the ends of your hair, and make easier for styling. Once a week use a deep scalp and hair mask, preferably once that nourishes the hair. It will help to smooth down and make your hair softer, so it is easier to manage and style.
5. Colored Hair Treatments. If you color your hair, it is more damaged then it would be normally. To help restrengthen your hair, use treatments that are enriched in keratin. The keratin soaks into the hair shaft, adding moisture back into the hair. For a greater effect, add the oil based treatment to your conditioner and let it sit on for 10 to 15 minutes so it can really soak in. Do this once a week and your hair will start to feel and look much healthier.
Try these treatments to help repair the damage that is done to your hair on a daily basis. You will soon have healthier looking and feeling hair.
~aphrodite
Saturday, April 13, 2013
7 Hot Nail Trends For The Spring & Summer
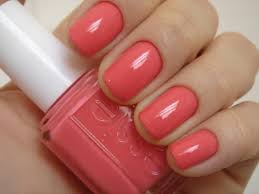
Nail trends are quick and easy ways to add a pop of color or make a statement to any outfit. The 7 biggest trends in nails are solid colors, tips, nail art, pastels, neutrals, glitter, and textured polishes. Here are the hottest nail trends, along with the hottest nail colors.
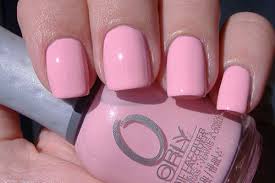
1. Solids. Solid colors work good for any occasion. If you have darker skin, do all white nails. For a color that goes great on all skin tones, try coral. To keep your look classic, use red nail polish. If you like to match your lipstick and your nail polish, fuchsia is the color to use. And for a metallic look, use silver but add an extra layer to make it extra shiny.


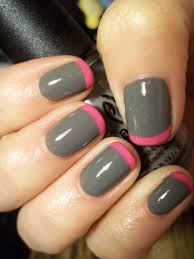
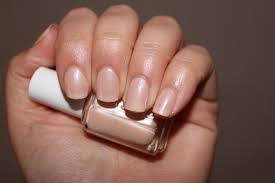
2. Tips. Nail tips don't just have to be the classic french white, you can do colored tips as well. Do a twist on a french manicure with one color underneath, and another color as the tips. You can also add glitter at the tips in place of polish. Try a reverse tip with the bottom of your nail in a different color then the rest of your nail. It will make a statement and have people noticing your awesome manicure.

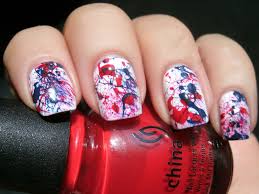
3. Nail Art. Nail art can be done with stickers or free handed. You can do the ombre nails just by using different polish colors and a sponge. Use a fine tipped polish to draw designs on your own nails, or buy the sticker decals to put on your nails. Any way you do the design, it will make your nails stand out from all the rest.


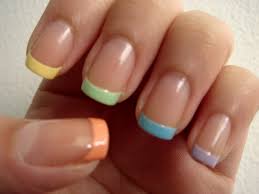
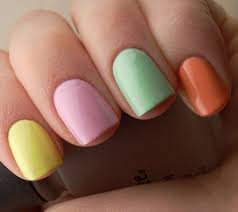
4. Pastels. Pastel colors are not only in for clothes, and hair, they are also in for nails as well. You can use a coral, baby blue, baby yellow, or even a lilac for your nails. You can even match them with your out fit for the day. Try also to combine two colors together and do half the nail one color, and half the nail another color to mix it up a bit.

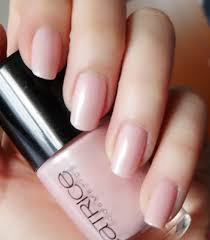
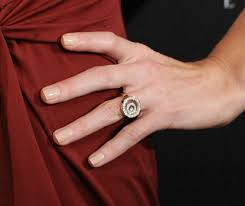
5. Neutrals. Neutral nails can go with any thing you wear and for any occasion. The key to the neutral nail trend is to use a polish that matches your skin tone, and not just use a clear or a neutral color. The best results are if you go a little bit darker then your skin tone, to get the full effect. Make sure you have a nicely done manicure before painting your nails.
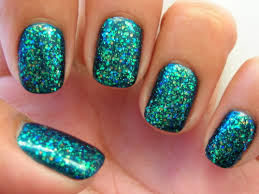
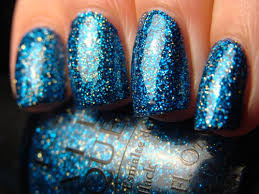
6. Glitter. Glitter nail polish is just about always in style. The biggest glitter nail polish colors that are in right now are light pinks or peaches, emerald greens, and darker blues. To really make the glitter come out, use a color that matches the glitter as a first layer (after your base coat) and put the glitter polish on top. It really adds an extra pop to your polish.

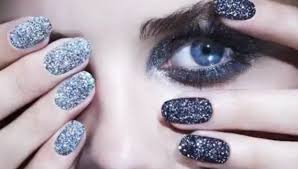
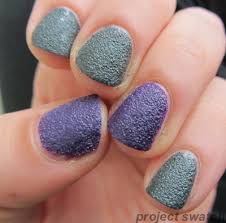
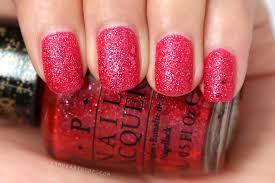
7. Textured. Textured nail polish is one of the newest and biggest nail trends of the year. The textured polish look gives an edge to the normal manicure. You can try the sand polish, foil finish polish, or even the latex like polish. They all give a different texture then the normal polish that you can not only see but feel as well.
These are the 7 hot nail trends for spring and summer. All of these trends can be done at home or in the salon. If your nails are in bad shape, then you can even get all of these trends (except the textured one) done in shellac, which will help make your nails grow healthier and stronger. It also doesn't chip. Try out these nail trends to add a new twist or pop of color to your style.
~aphrodite
1. Solids. Solid colors work good for any occasion. If you have darker skin, do all white nails. For a color that goes great on all skin tones, try coral. To keep your look classic, use red nail polish. If you like to match your lipstick and your nail polish, fuchsia is the color to use. And for a metallic look, use silver but add an extra layer to make it extra shiny.
2. Tips. Nail tips don't just have to be the classic french white, you can do colored tips as well. Do a twist on a french manicure with one color underneath, and another color as the tips. You can also add glitter at the tips in place of polish. Try a reverse tip with the bottom of your nail in a different color then the rest of your nail. It will make a statement and have people noticing your awesome manicure.
3. Nail Art. Nail art can be done with stickers or free handed. You can do the ombre nails just by using different polish colors and a sponge. Use a fine tipped polish to draw designs on your own nails, or buy the sticker decals to put on your nails. Any way you do the design, it will make your nails stand out from all the rest.
4. Pastels. Pastel colors are not only in for clothes, and hair, they are also in for nails as well. You can use a coral, baby blue, baby yellow, or even a lilac for your nails. You can even match them with your out fit for the day. Try also to combine two colors together and do half the nail one color, and half the nail another color to mix it up a bit.
5. Neutrals. Neutral nails can go with any thing you wear and for any occasion. The key to the neutral nail trend is to use a polish that matches your skin tone, and not just use a clear or a neutral color. The best results are if you go a little bit darker then your skin tone, to get the full effect. Make sure you have a nicely done manicure before painting your nails.
6. Glitter. Glitter nail polish is just about always in style. The biggest glitter nail polish colors that are in right now are light pinks or peaches, emerald greens, and darker blues. To really make the glitter come out, use a color that matches the glitter as a first layer (after your base coat) and put the glitter polish on top. It really adds an extra pop to your polish.
7. Textured. Textured nail polish is one of the newest and biggest nail trends of the year. The textured polish look gives an edge to the normal manicure. You can try the sand polish, foil finish polish, or even the latex like polish. They all give a different texture then the normal polish that you can not only see but feel as well.
These are the 7 hot nail trends for spring and summer. All of these trends can be done at home or in the salon. If your nails are in bad shape, then you can even get all of these trends (except the textured one) done in shellac, which will help make your nails grow healthier and stronger. It also doesn't chip. Try out these nail trends to add a new twist or pop of color to your style.
~aphrodite
Tuesday, April 9, 2013
4 Myths About Acne
Acne can be caused by stress, hormones, oily skin, dry skin, and numerous other things. There are myths out there about what causes acne and what some solutions are that can help prevent or heal it. These are 4 know myths about acne and what you should do instead.
1. Not washing you face before bed causes acne. While you should wash your face every morning and every night, not washing your face before bed will not cause any more acne. Acne is caused by an over production of sebum on the skin, which also causes your face to be oily. If you already experience breakouts, you should wash your face before going to bed to help prevent them from getting worse.
2. All foods with sugar and dairy cause breakouts. This myth is partly true. Foods rich in dairy and gluten are known for being related with breakouts. To help reduce acne breakouts, load up on foods like fruits, vegetables, and whole grains. This doesn't mean to skip the dairy all together, just keep your servings on the lower side. Sugary foods do not cause breakouts, when ate in moderation. If you eat various amounts of sugary foods on a daily basis, it can cause your insulin levels to increase which can produce acne. Try to cut down on the sugary foods to put your body in better health.
3. Prescriptions are better then over the counter. Prescription products are stronger then over the counter products, and can be even worse. They can cause dryness, irritation, redness, and burning if not properly used or given. Try over the counter products every day for 6-8 weeks. If you do not see a decrease in acne, then consult a dermatologist so you can get the problem solved with the right products.
4. Toothpaste will help get rid of a zit. Toothpaste when put on a zit, will dry up any excess oil but also dry's out your skin. The combination of products causes peeling and irritation to your skin, and should only be used for cleaning your teeth. If you are looking for a different way to reduce a zit, crush an aspirin, put it into a cup of water and apply over night. The aspirin will reduce the swelling and redness to help it heal faster.
These are four acne myths that have been busted, and four ways to correct them. I hope you have healthier, and better looking skin.
~aphrodite
Wednesday, March 27, 2013
The Do's & Don'ts of Hair Styling
Keeping your hair healthy and strong is not always an easy task. You color, highlight, straighten, blow-dry, and curl your hair all the time, so it seems like you do more damage then good. Here are some tips to help you return your hair to its natural healthy self.
DO- Use a heat protector. Almost every line of hair products has a heat protector. They prevent frizz, fly-away's, split ends, breakage, and dullness. Use a heat protector before blow-drying, straightening, or curling your hair.
DO- Pick the right tools. Use a wide-tooth comb or paddle brush to remove tangle's from your hair. Use a blow-dry with 2,000 watts or over to get a smooth, shiny style, with shorter drying time.
DON'T- Manhandle wet hair. When hair is wet, that is when it is the most fragile. Avoid excessive tugging, teasing, tying it up, and sleeping on it when wet. After you shower, wait a few minutes before brushing it. Add a leave in conditioner or detangler to help minimize damage and make hair easier to brush through.
DON'T- Obsessively flat iron. Flat ironing causes the most heat damage to hair. Set your iron at 400 degrees or less to avoid breakage.
DON'T- Forget your scalp. Any time you color your hair, you should do a treatment to help minimize the damage done to your hair. Scalp treatments with natural oils like almond, and coconut, help hair grow healthier and stronger.
DON'T- Skip the sunscreen. Most people know to put sunscreen on your skin but you can't forget about the damage the sun does to your hair. For every 100 hours of direct sunlight it is the equivalent of 30 minutes of bleach on your hair. Use a mist or products that have UV protection in it, if you are going to be spending a day in the sun.
Use these tips to properly style your hair and avoid any excess damage.
~aphrodite
Friday, March 22, 2013
Eyelash & Eyebrow Tint
Say good bye to raccoon eyes, and hello to never running mascara! Eyelash and brow tint is an all natural vegetable dye for your lashes that gives the look of mascara without the running and smearing. It gives the look of darker and fuller brows as well. The color will last up to 6 weeks.
To apply the tint, your eyelashes and eyebrows are gently cleansed with soap and water. If you have make-up on a gentle make-up remover will be used. Then you tell the consultant how dark you would like to be. Most people do the blackest black on there lashes, and the color of your brows depends on how dark or light your hair and skin are. They will mix the dyes, and apply Vaseline around the area. And cotton pads under your eyes to prevent staining. Then the dye will be applied on the bottom lashes first. You must keep your eyes wide open. Then the consultant will have you close your eyes and apply the dye to the top lashes. The longer the dye sits on the darker your lashes will be. The max is 10 minutes. Then they will apply the dye onto your eyebrows, and let sit for a max of 7 minutes. You do not want your eyebrows to become too dark. To remove, they will get a damp cotton round or pad and remove in a gentle downward motion. After all the dye has been removed, they will clean up any extra vaseline with a wash cloth. You will then be on your way with beautiful looking lashes or brows. The whole process takes 15-20 mins.
This is a quick and easy service, that will have your lashes looking dark, and appear longer. It costs $35 for lashes and $30 for eyebrows, but the results are worth the cost. Come get your lashes or eyebrows tinted today.

~aphrodite
Thursday, March 14, 2013
4 Ways To Glam Up Your Eye Make-up
Eye make-up is one of the easiest things to change up, and make a statement with. There are countless different colors you can use and different techniques to apply them. Spring is almost here, so it is time to change up your eyes. Here are the four hot trends for spring.

 1. Cat Eyes. The cat eye trend has been around since the 50's. It is making a come back in a dramatic and casual way. Angelina Jolie has the less dramatic version of the cat eye. To do a cat eye, use a hand held mirror under your chin so you look down. Put a neutral eye shadow on your lids. Pull your eye taunt and apply from the inner to outer corners of your lid using a brush and black powder. Lightly flick up at the ends. Go over with a liquid eyeliner. Go over more times to increase the thickness and to make it more dramatic like Amy Winehouse. Either way, it is a quick and easy way to update your eyeliner.

 3.Blue Shadow. When most people think of blue eye shadow, they think of bright blue 80's shadow, and it scares them. Blue shadow can be much more toned down, and elegant. If you are going for a smokey eye look, mix dark blue on the crease of your eye lid, and apply a dark grey on the eyelid. Use a white or light colored shadow to highlight underneath your brows. You can also do blue shadow like an eye liner. Pick the blue you want to use and do a thin line at your lashes on the top lid and underneath on your lower lid.


2. Lashes. Fake lashes or eyelash extensions are great for any day and any occasion. You see them used on the runway and for photo shoots, but they can be done in a less dramatic fashion, and give you the appearance of naturally fuller, longer lashes. The most common and easiest form are band lashes. To apply, add a coat of mascara to your normal lashes. Trim the false lashes to fit onto your own. Apply a thin layer of lash glue. Let it sit for about 10 seconds. Attach to your lashes using tweezers, and push them up so they are attached at the base of your lashes. These will give you the look of longer fuller lashes, but you may be able to tell they are fake. You can also use individual lashes. When applying individual lashes, start with longer lashes on the outer edge and work to small lashes on the inner portion of your lid. It will make them look much more natural. Apply a small amount of glue, and stick them to your natural lashes at the base, using tweezers. Move the lash so it is in place, and make sure it is fully secured. They usually last 2-3 days.
 3.Blue Shadow. When most people think of blue eye shadow, they think of bright blue 80's shadow, and it scares them. Blue shadow can be much more toned down, and elegant. If you are going for a smokey eye look, mix dark blue on the crease of your eye lid, and apply a dark grey on the eyelid. Use a white or light colored shadow to highlight underneath your brows. You can also do blue shadow like an eye liner. Pick the blue you want to use and do a thin line at your lashes on the top lid and underneath on your lower lid.
4. Copper & Metallic. Copper and metallic are extremely in and can work with any skin tone. To make this look succeed, the key is in a smooth application. Apply the color in a smooth motion, and use a brush to apply a lighter form of the color you used underneath your eyebrow and right above the crease of your eye to highlight the color.. Apply a thin line underneath the bottom lashes to complete the look.
Try one of these spring eye trends, for a night out or even just for a daily look. You will see that it will make your eyes really pop, and dress up any outfit.
~aphrodite
Subscribe to:
Posts (Atom)